|
|
 Author Author |
 Marcos 8042 Build (currently 9,119 views) Marcos 8042 Build (currently 9,119 views) |
| Mike_Smith |
| Posted on: March 16th, 2022, 22:59:23 |
  |
|
Minimum Member


Posts: 89
|
|
Let me introduce myself. I am located in Victoria BC and have been involved with Minis here in Canada since the 70's. I have owned about 15 or so..
I lose count over the years, and have had sedans, late and early one, including an older Cooper, a Moke, a Van, A Mini GTM Coupe and now I am building up a Mini Marcos kit from 1974. The kit has been bouncing around from owner to owner with the best of intentions on getting built, but it has not happened.
The current owner of this kit, Iain, has had it for about 15 years, and approached me to build the car for him. So here I am starting to pull it all together with a pile of donor parts in boxes and a shell with the usual Marcos bits. When it is drivable it will go back to Iain for the finishing touches.
I will post my progress and ask a bunch of questions on how it all goes together. The instructions are very general, so there are some areas I am not really sure how they go together. Thanks in advance for any help. Mike |
Mike in Victoria BC - building 8042 |
Last modified March 16th, 2022, 23:04:31 by Mike_Smith |
|
|
|
|
 |
| Mike_Smith |
|
Minimum Member
Posts: 89
|
|
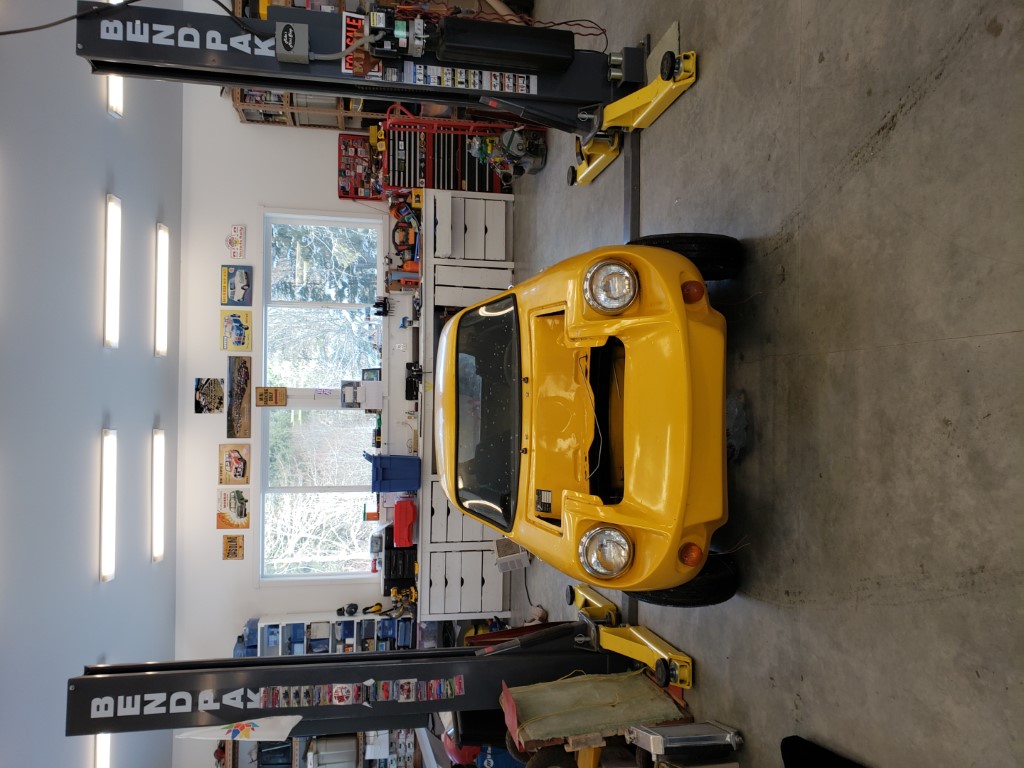
| Here is the Body Shell getting ready for the build |
Mike in Victoria BC - building 8042 |
 |
|
|
|
 |
Reply: 1 - 89 |
|
|
| Mike_Smith |
|
Minimum Member
Posts: 89
|
|
| and boxes of bits.. soon to find there way on or in the car... |
Mike in Victoria BC - building 8042 |
 |
|
|
|
| |
Reply: 2 - 89 |
|
|
| mike brown |
| Posted on: March 16th, 2022, 23:16:45 |
|
|
Big Member


Location: Southampton
Posts: 427
|
|
Welcome, Looks like it doesn't need much to get it running. I suspect the interior will be the longest job.
Mike |
|
|
|
| |
Reply: 3 - 89 |
|
|
| Mike_Smith |
| Posted on: March 16th, 2022, 23:32:56 |
|
|
Minimum Member
Posts: 89
|
|
| unfortunately it has nothing on the sub frames that is usable as sitting for so long all the rubber has perished and the metal bits have rusted, so first order of the day is getting suspension and braking sorted. That means new cones, all rubber parts, brakes, brake hoses and lines, brake cylinders, discs,shoes, brake lines ball joints, tie rod ends..etc.. Next up will be figuring out the mounting of all the parts on the firewall area, so I can put the engine and front sub frame in.. it will keep me busy for a while! |
Mike in Victoria BC - building 8042 |
|
|
|
| |
Reply: 4 - 89 |
|
|
| Mike_Smith |
| Posted on: March 17th, 2022, 18:04:18 |
|
|
Minimum Member
Posts: 89
|
|
A couple of questions I have..
1. How does the heater mount to the firewall? Do I have to fabricate a bracket to use the two rods on either side of the heater box. I am using a MK3 heater box.
2. The steering column is mounted to the underside of the fiberglass dash tray, but it seems inadequate to support it even with a steel plate on the topside of the try. Any suggestions for an additional mounting method?
3. For the door seals, is it best to use MK1/2 style or the MK 3 door seals with the rubber bulb on them?
4. for mounting the wiper motor, was there a bracket supplied to mount inside on the dash tray?
Thanks.. Mike |
Mike in Victoria BC - building 8042 |
|
|
|
| |
Reply: 5 - 89 |
|
|
| mike brown |
| Posted on: March 18th, 2022, 18:41:22 |
|
|
Big Member
Location: Southampton
Posts: 427
|
|
Yes you will need to make some brackets for the heater.
The steering column is normally just bolted through the lower rail of the dash, yes a spreader plate is required. I have in the past had to add some fibreglass reinforcement to this area.
Door seals I've bought from a car trim company and picked the size and shape that best suited the gap.
From memory the wiper motor mounts on the bump in the bulkhead (opposite your chassis plate). Normally on the engine bay side then passing through the bulkhead to the wheelbox holes but I have seen them mounted inside the dash to.
Mike |
|
|
|
| |
Reply: 6 - 89 |
|
|
| Mike_Smith |
| Posted on: March 19th, 2022, 17:35:13 |
|
|
Minimum Member
Posts: 89
|
|
| Thanks Mike, I appreciate the information. Is there a usual way to mount seat belts in the car, as there seems to be no provision for this with any mounting points in the car body. |
Mike in Victoria BC - building 8042 |
Last modified March 19th, 2022, 17:36:34 by Mike_Smith |
|
|
|
| |
Reply: 7 - 89 |
|
|
| mike brown |
| Posted on: March 19th, 2022, 21:26:55 |
|
|
Big Member
Location: Southampton
Posts: 427
|
|
Some cars had mounts on the tunnel, B post and sill they were just metal plates with a captive nut glassed in place. However some had nothing, if there isn't any the normal practice is to fit a large spreader plate on the outside and bolt through the body and plate. Obviously this wouldn't be very good on the B pillar so most fit harnesses and mount the shoulder straps through the rear floor just in front of the fuel tank.
Mike |
|
|
|
| |
Reply: 8 - 89 |
|
|
| Mike_Smith |
| Posted on: March 20th, 2022, 17:55:17 |
|
|
Minimum Member
Posts: 89
|
|
| There appears to be nothing on this body, so will end up glassing in some steel plates with captive nuts then. I have to build some floor mounting bases for the seats, so I may tie that into the belt mounts at the front as well. Lots to think about. Thanks again. |
Mike in Victoria BC - building 8042 |
|
|
|
| |
Reply: 9 - 89 |
|
|
| mike brown |
| Posted on: March 21st, 2022, 19:53:49 |
|
|
Big Member
Location: Southampton
Posts: 427
|
|
If you go for harnesses you can pick up on the rear subframe but you'll need to make some brackets, bare in mind the subframe is rubber mounted.
Mike |
|
|
|
| |
Reply: 10 - 89 |
|
|
| Mike_Smith |
| Posted on: March 22nd, 2022, 20:05:09 |
|
|
Minimum Member
Posts: 89
|
|
I do have a set of belts already which has one strap heading to the back, so was thinking making a bracket picking up the front sub frame mounting bolts for the rear sub frame and also the floor area . Thanks for the suggestion.
The other Mike  |
Mike in Victoria BC - building 8042 |
|
|
|
| |
Reply: 11 - 89 |
|
|
| Mike_Smith |
| Posted on: March 23rd, 2022, 00:07:12 |
|
|
Minimum Member
Posts: 89
|
|
| Another question... How do sun visors mount to the car. The headlining is already installed on the car from when it was first delivered, and I can't seem to find any spot where a mounting block may have been added under the headlining. |
Mike in Victoria BC - building 8042 |
|
|
|
| |
Reply: 12 - 89 |
|
|
| mike brown |
| Posted on: March 23rd, 2022, 20:52:45 |
|
|
Big Member
Location: Southampton
Posts: 427
|
|
Some cars had a strip glassed in across the roof, some had four blocks and some had nothing. All three options are obvious, if you have blocks or a strip short screws work fine. If you have nothing your options are limited personally I've never bothered with them but I'm 6'3" so sun visors are pointless for me. The other option is to either peel back the headlining and glue some blocks in or cut the headlining out where you want the block, upolster the block and glue it to the roof where your cut out is.
Mike |
|
|
|
| |
Reply: 13 - 89 |
|
|
| Mike_Smith |
| Posted on: March 24th, 2022, 00:56:59 |
|
|
Minimum Member
Posts: 89
|
|
“ |
Quoted from mike brown, posted March 23rd, 2022, 20:52:45 at here |
” |
Some cars had a strip glassed in across the roof, some had four blocks and some had nothing. All three options are obvious, if you have blocks or a strip short screws work fine. If you have nothing your options are limited personally I've never bothered with them but I'm 6'3" so sun visors are pointless for me. The other option is to either peel back the headlining and glue some blocks in or cut the headlining out where you want the block, upolster the block and glue it to the roof where your cut out is.
Mike
|
|
Thanks Mike.. might just skip the visors.
|
Mike in Victoria BC - building 8042 |
|
|
|
| |
Reply: 14 - 89 |
|
|
|


 Mini Marcos Forum > General Boards > Mini Marcos > Marcos 8042 Build


 Logged
 Attachment: